
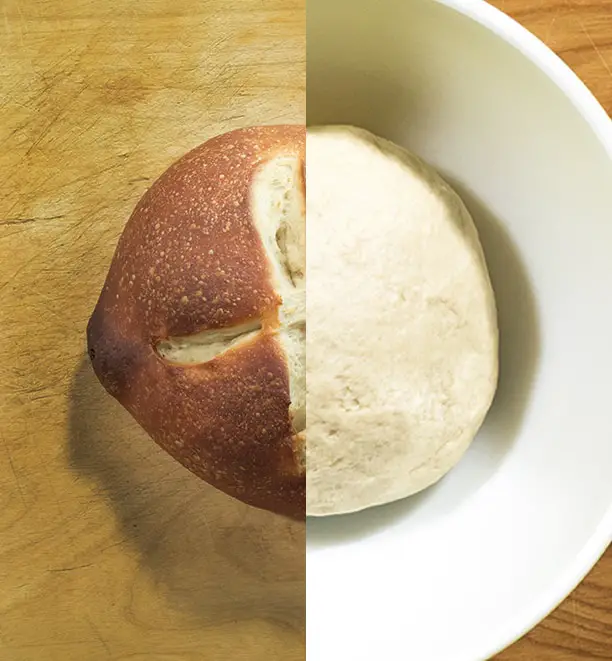
There’s nothing like fresh-baked bread. Unfortunately, many of us live such busy lives that it’s hard to carve out the time to bake fresh loaves or rolls on a regular basis. A common time-saving practice is to either freeze dough, or to bake a loaf of bread and then freeze the already baked loaf.
But which is better – to freeze the dough or to freeze the pre-baked bread? For the best results, freeze the dough and then bake it when you’re ready to serve. Most doughs can be frozen with no adverse effects, and the final product will be fresher and tastier than thawed bread. However, if you’re really going to be crunched for time, it’s possible to freeze and then thaw pre-baked bread or rolls. The end product will be tasty, but not quite as good.
It really just depends on what’s more important – having the tastiest bread possible, or saving as much time as possible. It also depends on what you want to use the final product for. If you’re serving the bread as is, as we said, it will taste better if you’ve frozen the dough and then baked it after thawing. But if you intend to use the bread in other applications, like bread pudding or french toast, then freezing and reheating the already baked bread will be best. You want stale bread for those uses, so why not save yourself the time?
There’s also a third option for fresh bread in less time. Stay tuned to the end for that tip.
How to Freeze, Thaw, and Bake Dough
The basic steps of freezing and using dough is to follow your recipe as directed from mixing through shaping, then to put the shaped dough in the freezer. Whenever you freeze dough, always put it in the freezer after it’s been shaped but before it starts the final rise.
Traditional Loaves
To freeze – after following the recipe’s instructions from mixing up to shaping, shape the dough into a log and place it in a loaf pan lined with plastic wrap. You can skip the loaf pan and move along to the next step, but this will ensure that the bread keeps its shape as it freezes. Cover tightly with more plastic wrap and place in the freezer. Leave it overnight, or about 10 hours, until frozen solid. Then remove it from the loaf pan and place in a resealable plastic freezer bag or other freezer-safe container. The frozen dough will be good for up to 3 months.
To bake – several hours before baking take the dough out of the freezer and place it in a well-oiled loaf pan. Cover with plastic wrap or a towel, then leave in a warm place to thaw and rise. This could take 4 – 6 hours. Watch carefully so that the dough doesn’t over-proof. When the dough is thawed and doubled in size, bake according to directions.
Want to get started? Living Well Spending Less has an easy freezer bread recipe here.
Rolls
To freeze – After mixing and kneading, immediately shape dough into rolls. That’s right – don’t let the dough go through it’s first rise in a bowl. After shaping, place on an oiled baking sheet. Cover with oiled plastic wrap and place in the freezer overnight, or about 10 hours. Then remove the frozen rolls from the sheet tray and place in a resealable plastic freezer bag or other freezer-safe container. The frozen dough will be good for 2 – 3 weeks.
To bake – several hours before baking take the rolls out of the freezer and place on a well-greased sheet tray. Cover with plastic wrap or a towel and leave in a warm place to thaw and rise. This could take 4 – 6 hours. Watch carefully to make sure the rolls don’t over-proof. When the rolls are doubled in size, bake according to directions.
Want to get started? King Arthur’s soft white dinner rolls are perfect for this.
Additional tips for freezing dough:
- Following the steps above, almost any bread or roll dough can be frozen.
- While some bakers swear that you can freeze dough without altering the recipe, others say that adding extra yeast will give the best results. If you’re unsure, or just want to make sure your bread rises as much as possible, add 20% more yeast than the recipe calls for. So the formula is as follows: Original yeast amount x 1.2, which will give you 20% more. However, this will not always produce a common measure of measuring spoons. You’ll need to round a bit. We went ahead and converted a few and rounded them for you. See the chart below. (Recipes for dough that is intended to be frozen doesn’t need this precaution)
- Be sure to label frozen dough with the date.
- Frozen dough can also be thawed in the refrigerator. It’ll just take longer – a couple of days, instead of several hours.
| Original Yeast | New Yeast |
| 2 tsp | 2 1/2 tsp |
| 2 1/4 tsp | 2 3/4 tsp |
| 2 1/2 tsp | 3 tsp or 1 tbs |
| 2 3/4 tsp | 3 1/3 tsp |
| 3 tsp | 3 2/3 tsp |
Does This Work for No-Knead Bread Dough?
Yes! The process is very similar to that of regular bread dough. But for best results, let the dough chill overnight in the fridge before shaping and freezing. Do note that the end result will be a flatter loaf of bread if it was baked fresh, but it’ll still taste great. King Arthur Flour (again!) has great step-by-step instructions here.
How to freeze and reheat pre-baked bread:
To freeze – after baking, allow the bread to cool completely. 3 to 4 hours is the recommended time. When cool, wrap completely, either tightly in plastic wrap or in resealable plastic freezer bag (double bagging it is the safest way to go). It can stay in the freezer for 3 to 6 months.
To thaw – When you’re ready to serve the bread, pull it out of the freezer, keeping it in its wrapping, and leave on a counter space until it reaches room temperature. Don’t worry about any extra moisture inside – the bread will re-absorb it. When the bread reaches room temperature, it’s good to eat.
Want step-by-step instructions? The Kitchn breaks it down for you here.
Tips for freezing and reheating bread:
- Follow the same steps to freeze and thaw pre-baked dinner rolls.
- As with freezing dough, it’s a good idea to date the bread to keep track of how old it is.
- Everyone agrees that bread that has been frozen is much better warmed. After it reaches room temperature, put it on a sheet tray or cast iron skillet and warm in a 350° F oven for 10 minutes.
- According to the folks at King Arthur Flour, if you’re really in a rush you can bake straight out of the freezer. Simply place on a sheet tray or cast iron and bake at 400° for 20 minutes. But be aware that bread reheated straight from frozen will go stale much more quickly.
Another Option: Parbake
It turns out that there is a third option. You can partially bake bread or rolls, pulling them out before they’re done, and freeze. Then when you’re ready to serve, reheat for a few minutes to complete the baking process. Here’s how it’s done.
To bake – follow your recipe exactly, except for one thing: don’t bake the bread as long as the recipe calls for. A rule of thumb is to bake it for 25% less time. For example, if the recipe calls for a 20 minute bake, multiply 20 x .25 = 5. We will subtract 5 minutes from the bake time. The main idea here is to bake the loaf until it reaches an internal temperature of 185°, but hasn’t begun to brown. When the bread has reached the desired stage, remove from the oven and allow to cool completely.
To freeze – When completely cool, wrap the bread tightly in plastic wrap or in resealable freezer bags.
To thaw – preheat oven to the same temperature called for in the original recipe. Unwrap frozen bread, place on baking vessel (you can use a baking sheet, cast iron pan, or dutch oven) and place directly in oven (still frozen). Cook for twice the time that was subtracted from the original recipe. So in the above example, we took 5 minutes off the baking time – now we’ll re-heat the frozen bread for 10 minutes. Take out when golden brown.
Tips for freezing and reheating parbaked bread:
- This method works just as well with rolls and yeasted sweet breads.
- As with everything else, be sure to write the date on the frozen bread so you know how old it is
- If you plan on serving the bread in a day or two, you can skip freezing altogether and just store the par-baked loaf, tightly wrapped in plastic, in your fridge until needed. Follow the same directions for baking.
- To achieve an extra-crispy crust, when baking the bread preheat a roasting pan or cast iron in the oven (this is different than the pan you’ll put the bread in). When you put the bread in the oven, pour a couple cups of boiling water in the separate pan and leave in the oven while the bread bakes. This will create steam, which causes the bread to form a great crust.